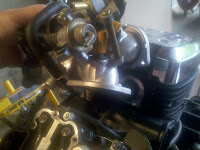
I started off removing the rocker box cover of the front cylinder.
Turn the crank and get the front cylinder to TDC.
There is stuff in the way, like the throttle body and airbox tube, so that we can get at the cam tensioner.
Remove the cam tensioner and disconnect the oil line.
Repeat this process for the rear cylinder.
Both cylnder cam bearings appear to have an O-ring coated with something, possibly silicon sealant. The manual stated there shouldn't be any sealant near this. hmmmmm
Now, the funny thing is ... I did all this under the premise that one (or more, although it sounds like only one) of the HLAs on the rocker arms had air in it instead of oil from oil starvation. Interestingly when I remove the HLA from each rocker, I try to squeeze the plunger and it does not budge.
The test for defect is that the plunger would be down already or go down and stay down and not rebound. Yet I can not budge these. I put them all in oil. I then did a little research.
Interesting.. I find that the Subaru boxer engine has this design with HLAs. They show recharging an HLA by putting it in a 12mm socket and filling it with oil and then using a tool like a small allen wrench to bounce the ball in the HLA forcing air out and oil in.
I could not budge the HLA ball, just like I could not move the plunger. hmmmm... this wasn't supposed to be this hard. I put the HLA back in the oil horizontal and used the allen wrench and much more force and felt it finally give. I could feel the spring action and bounce it a few times, and would work the plunger while I did it. Dirty oil came out. When I stopped bouncing the ball with the wrench I could push the plunger one more time and it would rebound and then I could not push it again. This seems to gibe with how an HLA is supposed to work.
Here is a description from
http://www.miata.net/garage/hla/index.html:
So just how do these lifters work? The concept is a self adjusting thickness lifter that keeps the lifter in contact with the cam shaft and top of the valve at all times.
Intentionally these HLAs (Hydraulic lash adjusters) are designed to let oil flow in between the inner and outer plunger assembly in only one direction. The oil pump pushes oil past the check ball in the inner plunger. This oil pressure (combined with the plunger spring pressure) pushes the outer plunger away from the inner plunger, which makes the HLA grow taller (the outer plunger pushing down against the valve, and the inner plunger pushing the lifter body towards the cam shaft.). Then BAM!!! All of a sudden the cam shaft lobe is pushing down with great force on the Lifter Body, which transfers that force to the inner plunger. This reverse pressure tries to force the oil between the inner and outer plunger back out the hole in the center of the inner plunger. OH wait! There’s a check ball that now gets slammed shut from the pressure. The oil has nowhere to go. The two plungers fit together so closely that the oil can’t even squeeze between their walls The two plungers are immediately in Hydraulic lock, and the cam shaft forces the valve open pushing all the cam force through the oil trapped between the plungers. Works like a charm.
There’s just one drawback: the oil never gets out. Ok maybe a very small amount escapes around the walls, or past the check valve, but it’s still trapped inside the built in reservoir of oil that the top of the HLA has sitting there ready for getting stuffed back in between the plungers. And the HLA reservoir top is designed just like plungers, one little hole flowing oil in (under oil pressure) and no holes out. So this oil is essentially stagnant inside the HLA.
Stagnant oil wouldn’t be bad, except for when it breaks down and thickens up. Then the oil pump can’t force enough oil in through the three small holes and past the check ball to ensure that the chamber in between the plungers stays pressurized. Not enough oil pressure means that the chamber between the plungers shrinks by enough to allow a small space between the valve and lifter or cam and lifter. This small space allows the metal to impact metal making our favorite HLA “Tick Tick Tick” noise. Another 4 hours spent on this. I am still not sure if this is the problem or not.
Any ideas?


 The alternator cover is off. Time to disconnect all the electrical.
 Those long lines run to the front and the starter.


 I disconnected these, but it was not necessary so I put them back.
 You can see the cavity where the clutch slave cylinder goes. That dumped some oil out when I left it hanging.


